A black and brown planner opened like a laptop. Inside is a greyscale eink phone inside a brown piece of MDF on top, and a black keyboard fills the bottom half.

Foliodeck Squeezes A Writerdeck Into A Planner

When it comes to writing, sometimes a computer or smartphone is just too distracting to keep on task. [vagabondvivant] found this to be the case and rolled their own distraction-free writing tool, the Foliodeck.

With the increasing availability of parts for cyberdecks, it’s not too surprising to see we’re seeing the emergence of the writerdeck. Typically designed to be a no frills word processing device, they are designed to help their creators focus on writing and not be subject to the myriad notifications present trying to work with a more general computing device or smartphone.

In this case, [vagabondvivant] took a classy looking planner folio and removed its paper management components to leave a fabric and leather shell. The heart of the assembly is a HiSense A5 eink smartphone magnetically attached to a piece of MDF cut to mate the phone to the planner shell. A 10 Ah powerbank slots into the MDF below the keyboard which is also magnetically attached, and the whole thing zips up nicely. Future improvements are planned like a hinge, so it doesn’t have to be propped against something and a custom-built mechanical keyboard.

This isn’t the first writerdeck we’ve seen, and we’ve seen some other writer-focused decks and typewriter replacements.

Continue reading “Foliodeck Squeezes A Writerdeck Into A Planner”

Home Assistant Display Uses E-Ink

[Markus] grabbed an ESP32 and created a good-looking e-ink dashboard that can act as a status display for Home Automation. However, the hardware is generic enough that it could work as a weather station or even a task scheduler.

The project makes good use of modules, so there isn’t much to build. A Waveshare 2.9-inch e-ink panel and an ESP32, along with a power supply, are all you need. The real work is in the software. Of course, you also need a box to put it in, but with 3D printing, that’s hardly a problem.

Well, it isn’t a problem unless — like [Markus] — you don’t have a 3D printer. Instead, he built a wooden case that also holds notepaper.

The software uses ESPHome to interface with Home Assistant. There is a fair amount of configuration, but nothing too difficult. Of course, you can customize the display to your heart’s content. Overall, this is a great example of how a few modular components and some open-source software can combine to make a very simple yet useful project.

There are many ways to use an ESP32 in your home automation setup. Maybe you can salvage the e-ink displays. Just try not to get carried away.

A DIY E-Ink Tank Watch

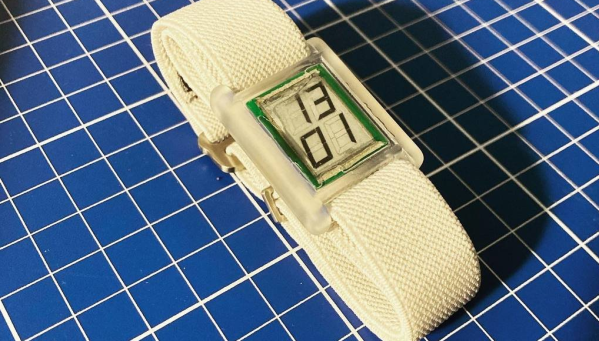
[Augusto Marinucci] liked the classic Cartier Tank series of dress watches aesthetic, but wanted something a bit more techy, with a decent runtime on a single battery. E-Ink displays are often used in such applications, but finding one to fit a custom case design, is a tall order. When ordering one off the shelf is not easy, the solution is to make one from scratch.

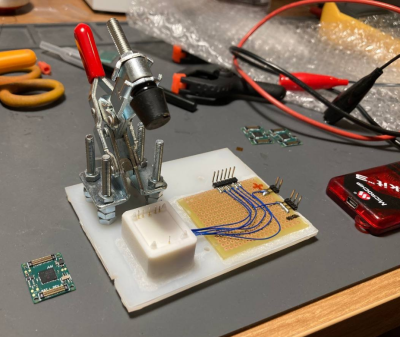
Building a programming jig is a great idea for small-scale production

The article doesn’t have much information on the E-Ink side of things, which is a bit of a shame. But from what we can glean, the segment shapes — in this case, based on the famous Apollo DSKY — are formed in the top copper of a four-layer PCB, using filled and capped vias to connect invisibly from below.

A donor E-Ink display is cut to size with scissors (we don’t know much more than this!) and glued in place around the edge to make the common electrode connection. The display PCB attaches to the control PCB, at the rear using low-profile board-to-board connectors. This board hosts a PIC16 micro, as well as an RV-3028-C7 RTC which keeps time whilst consuming a paltry 45 nA.

Five volts are provided via a MAX1722 low-power boost converter which is fed power from the CR1616 cell via a couple of logic-controllable load switches. With a low-power design such as this, it’s critical to get this correct. Any mistakes here can easily result in a very low runtime. It is easy to over-stress small button cells and kill them prematurely.

The case looks like it’s printed in a translucent resin, with the PCB stack sealed inside with a UV-cured resin pour. It’s not immediately obvious if the rear panel can be removed to access the battery and programming port. There are what appear to be screw holes, so maybe that’s possible, or maybe they’re the rear side of the PCB mounting posts. Who can tell?

If DIY hardware is but too much effort for you, then there’s the option of hacking new firmware onto an existing watch, or perhaps meeting in the middle and making something out of all those junk E-ink tags you can get from time to time?

Thanks to [JohnU] for the tip!

Hacking An NFC E-Paper Display From Waveshare With Mystery MCU

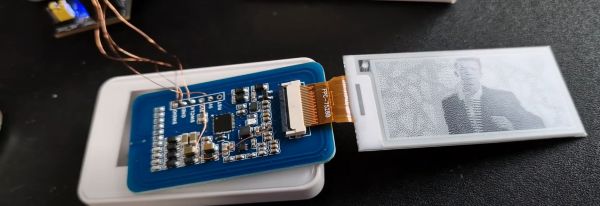
These days e-paper (eInk) displays are everywhere, with stores being one of the largest users of smaller, monochrome versions of these persistent displays. This has also made them a solid target of hackers who seek to not only reverse-engineer and reuse discarded ones, but also ones sold to consumers, with [Aaron Christophel] recently reverse-engineering and flashing custom firmware (GitHub source) to a Waveshare 2.13″ NFC-Powered E-Paper display.

What’s perhaps most notable is how locked-down and devoid of documentation these devices are. The board [Aaron] looked at did not have any markings on the main IC, and Waveshare did not provide more information other than the Android and iOS apps. This led to some matching of various NFC-enabled MCUs with the pinout, with the Chivotech TN2115S2 rolling out as the most likely candidate. This is an 8 MHz Cortex-M0 MCU with not only NFC, but also an energy harvesting feature (up to 300 mW), which is why this e-paper tag can update the display without external power or a battery.

With the Chivotech datasheet being rather sparse, more reverse-engineering needed to be done, which included dumping the firmware and exploring it with Ghidra. During this, the secret key was discovered to make the Flash writeable along with how to control the peripherals and display. With this knowledge it’s now possible to make this tag display update without being limited by manufacturer-supplied tools and software, making it infinitely more useful.

Continue reading “Hacking An NFC E-Paper Display From Waveshare With Mystery MCU”

Building A Weather Display In Rust

We’ve seen a lot of weather displays over the years, and plenty of the more modern ones have been using some form of electronic paper. So what makes this particular build from [Harry Stern] different? The fact that the firmware running on the ESP32 microcontroller at its heart was developed in Rust.

The weather station itself is capable of operating for several months on its rechargeable NiMH battery bank. The Rust section of the project is in two parts, the first of which runs on a server which downloads the weather data and aggregates it into an image. The second part runs on the ESP32 using esp-idf which configures peripherals, turns on and connects to Wi-Fi, retrieves the image from the server, displays the image and then puts the display to sleep. By doing the heavy lifting on the server, the display should be able to run for longer than it would if everything was happening on the ESP32.

The project code is available from this GitHub page which should allow even Rust beginners to follow along, and the case file is also available for those with a 3D printer. [Harry] has a few upgrades planned for future releases as well, including a snap-fit case, a custom PCB, and improved voltage regulator for better battery life, and enhanced error handling for the weather API. And Rust isn’t the only interesting part of this project, either. As prices for e-paper displays continue to fall, more and more of them are found in projects like weather stations and even complete laptops which use these displays exclusively.

What’s Black, White, And Red On 20 Sides?

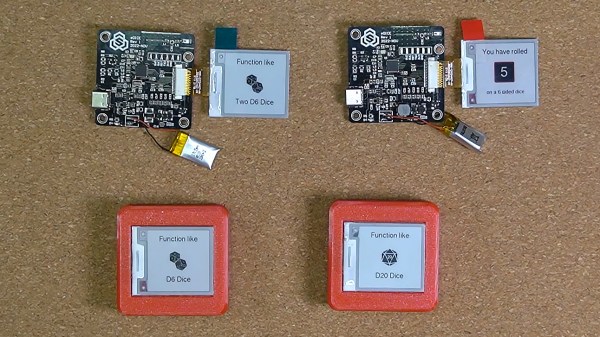
You won’t need to pack a full set of dice for your next game with this DIY Multifunctional Eink Gadget. [Sasa Karanović] brings us a fun device that combines a few essential aspects of tabletop gaming, D6, D12, and D20 dice rolling and a hero dashboard. While they have grand plans for a BLE networked future application, we admire the restraint to complete a V1 project before allowing scope-creep to run amok. Well played!

For this project, [Sasa] realized it needed to be battery powered and just choosing the right display for a battery powered application can be daunting. Even if you aren’t building this project, the video after the break includes a nice intro to electronic ink and low power microcontrollers for the uninitiated. We even see a graph of the completed board’s power draw from the button wake up, display refresh, and low power sleep. The project has some neat tips for building interaction into case design with the use of the display and a flexible bezel as integrated buttons. Continue reading “What’s Black, White, And Red On 20 Sides?”

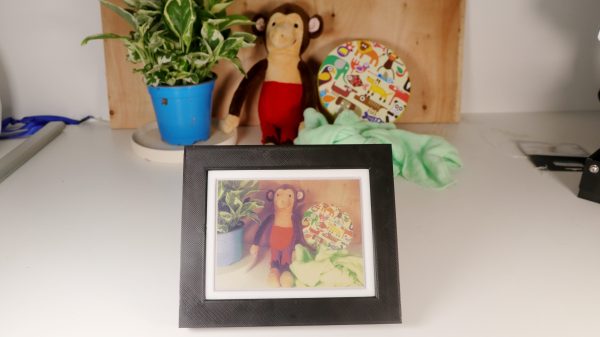
Building A WiFi Picture Frame With An EInk Display

LCD photo frames never really caught on — by emitting light, they didn’t seamlessly blend in with a home’s decor in the way printed photos do. [Sprite_tm] decided to see if a color e-Ink screen could do any better, and whipped up a WiFi-enabled photo frame using a Waveshare display.

The part in question is a 5.65-inch display with 640 x 448 resolution, and is capable of displaying seven colors. It’s not designed to display photorealistic images, so much as display simple graphics with block colors. However, with some dithering, [Sprite_tm] suspected it might do an okay job. An algorithm that uses Floyd-Steinberg diffusion and the CIEDE2000 color space takes regular RGB images and breaks them down into dithered images that are displayed using the screen’s 7 available colors.

The build relies on an ESP32-C3, which drives the display and fetches new images daily over WiFi. Thanks to the e-Ink screen, which uses zero power when not updating, the whole setup runs off two AA batteries and a Natlinear LN2266 boost converter.

There are some limitations; the screen’s color space is altogether quite limited, and images don’t look very high-fidelity in such low resolution. However, it does an able job of displaying photos for a device that was never designed to do so. It looks rather handsome all wrapped up as a 3D printed picture frame, and [Sprite_tm]’s monkey test photos are very cute.

Files are on GitHub for those that wish to roll their own. We’ve seen similar works before, like this e-Ink wall-hanging newspaper display that keeps up with the times. If you’ve got your own neat e-ink build, hit us up on the tipsline!