Upgrade Your Voodoo With More Memory

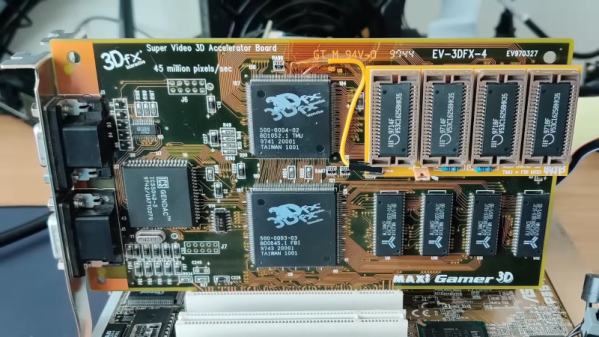
In 1996, the 3Dfx VooDoo VGA chipset changed computer graphics forever. Because of the high cost of memory, most of the boards had only 4 MB of memory — which seemed a lot back then. However, the chipset could actually handle up to 8 MB. [Bits and Bolts] couldn’t stand that his board only had 4 MB, so he did what any good hacker would do: he figured out how to add the missing memory!

The mod has been done before using the “piggyback” technique, where you solder the new RAM chips on the old chips and bend out a few pins out to directly wire them to chip selects elsewhere on the board. [Bits and Bolts] didn’t want to try that, so instead, he developed a PCB that slips over the chip using a socket.

Continue reading “Upgrade Your Voodoo With More Memory”

Reshoring Vacuum Tube Manufacturing, One Tube At A Time

For most of us, vacuum tubes haven’t appeared in any of our schematics or BOMs in — well, ever. Once mass-manufacturing made reliable transistors cheap enough for hobbyists, vacuum tubes became pretty passe, and it wasn’t long before the once mighty US tube industry was decimated, leaving the few remaining tube enthusiasts to ferret out caches of old stock, or even seek new tubes from overseas manufacturers.

However, all that may change if [Charles Whitener] succeeds in reshoring at least part of the US vacuum tube manufacturing base. He seems to have made a good start, having purchased the Western Electric brand from AT&T and some of its remaining vacuum tube manufacturing equipment back in 1995. Since then, he has been on a talent hunt, locating as many people as possible who have experience in the tube business to help him gear back up. Continue reading “Reshoring Vacuum Tube Manufacturing, One Tube At A Time”

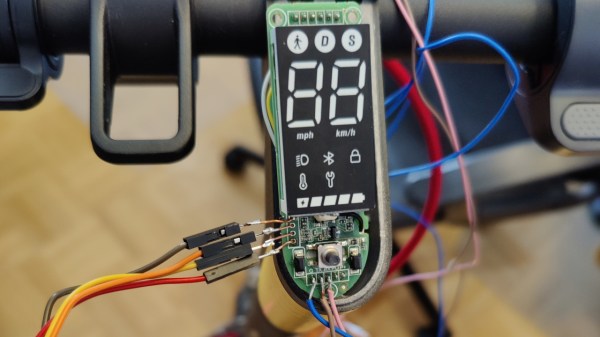
A Xiaomi 3 Lite dashboard with the panel taken off and the PCB visible, four wires connected to the SWD header.

Xiaomi Scooter Firmware Hacking Gets Hands-On

Scooter hacking is wonderful – you get to create a better scooter from a pre-made scooter platform, and sometimes you can do that purely through firmware modifications. Typically, hackers have been uploading firmware using Bluetooth OTA methods, and at some point, we’ve seen the always-popular Xiaomi scooters starting to get locked down. Today, we see [Daljeet Nandha] from [RoboCoffee] continue the research of the new Xiaomi scooter realities, where he finds that SWD flashing is way more of a viable avenue that we might’ve expected. Continue reading “Xiaomi Scooter Firmware Hacking Gets Hands-On”

3D Printed Post Modern Grandfather Clock

Projects can often spiral, not down or up, but out. For [Derek] he started playing around with a 3D printed escapement mechanism and thought it was a wonderful bit of engineering. But with a simple drum and weight, it only had a runtime of a few minutes. What started as a simple “can I make it run longer” spiraled into a full-blown beautiful grandfather clock.

A gear drive, a ratcheted winding sprocket, and a ball chain gave the clock about one hundred minutes of runtime. Adding a recharging mechanism was fairly straightforward. The weight automatically rewinds with the help of an ESP32, a motor, and some limit switches. While an ESP32 is absolutely overkill for this simple project, it was cheap and on hand. A quick hall effect sensor to detect the pendulum passing made it into a proper clock. Considering it’s a printed plastic clock, losing only 2-3 seconds per day is incredibly good. The whole thing is wrapped in a gorgeous wood case with a distinct design.

Surprisingly, everything was designed in OpenSCAD and Blender. [Derek] includes some great tips such as cleaning out the ball bearings to make them run smoother and suggestions on how to make a plastic clock move without binding. Clock making is a complex and sometimes arcane art, which makes watching the process all the more interesting.

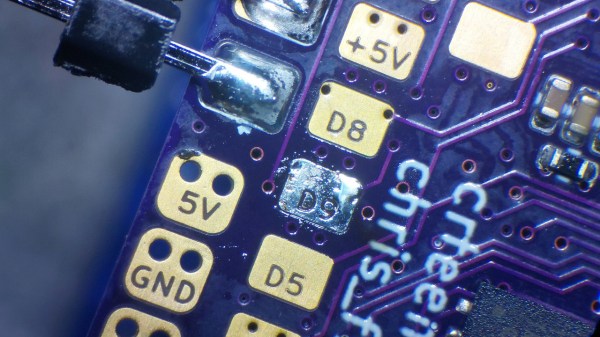
Picture of the PCB with the text inside the copper pads

Silkscreen Busy? Put Labels Inside Pads

When making a PCB informative and self-documenting, there’s often just not enough space to silkscreen all the labels you want, and slowly but surely, you collect a set of tricks: using different through-hole pad shapes to denote ground or power pins, standardized pinouts for connectors, your own signal name shortening notations, and so on.

What if you have some large-ish signal pads on your board, and having the signal names on silkscreen just isn’t good enough? In this case, here’s a new trick for your toolkit: [Christoph] from [MakerProbe] shows us how he puts text directly inside the copper pads.

What you need is a set of Gerber files and a Python script. Technically, this ought to work with any PCB EDA, with [Christoph] using KiCad. You need to put the to-be-subtracted signal names on their very own layer, export Gerber files without features like aperture macros, then run the script. You’ll get a new copper layer as a result, it’s that simple. We also get a set of tips on what kinds of pads suit best and how to prepare them — and fancy-looking real-life examples. You get higher resolution than for on-silkscreen text, solderability isn’t impacted, and the labels are even visible after desoldering wires from the pads. What’s not to like?

Over on Twitter, [Makerprobe] have been doing things like 0201 tombstoning and BGA yield research – we say they’re worth a follow if you’d like to see someone pushing PCB boundaries! Innovative PCB design methods and tricks have a special spot in our hearts, what’s with things like this Tux-emblazoned desktop motherboard that’s also a guide on PCB aesthetics, and there’s a whole lot more you can do to make your PCBs pretty while preserving and even improving functionality. From turning rigid PCBs flexible to hiding components inside a PCB stack, there’s plenty of opportunities that we are yet to extract out of PCB world, and it’s lovely to see one more technique we can make use of.

Continue reading “Silkscreen Busy? Put Labels Inside Pads”

Supercon 2022: Chris Combs Reveals His Art-World Compatibility Layer

[Chris Combs] is a full time artist who loves using technology to create unique art projects and has been building blinky artwork since about a decade now. In his 2022 Supercon talk “Art-World Compatibility Layer: How to Hang and Sell Your Blinky Goodness as Art” (Slides, PDF), [Chris] takes us behind the scenes and shows us how to turn our blinky doodads in to coveted art works. There is a big difference between a project that just works, and a work of art, and it’s the attention to small details that differentiates the two.

Just like the field of engineering and technology, the art world has its own jargon and requires knowledge of essential skills that make it intimidating to newcomers. It’s not very easy to define what makes an artwork “art” or even “Art”, and sometimes it’s difficult to distinguish if you are looking at a child’s scrawls or a master’s brushstrokes. But there are a few distinguishing requirements that a piece of artwork, particularly one revolving around the use of technology, must meet.

Continue reading “Supercon 2022: Chris Combs Reveals His Art-World Compatibility Layer”

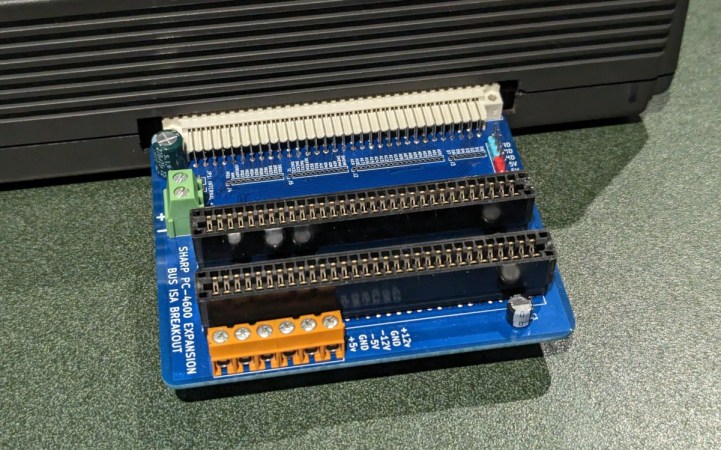
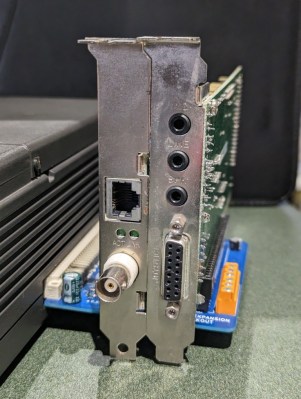
An expansion board with two 8-bit ISA slots plugged into a Sharp laptop

New Expansion Module Brings Standard Slots To Ancient Laptop

Upgrading and repairing vintage laptops is often a challenge — even if their basic hardware is compatible with ordinary PCs, they often use nonstandard components and connectors due to space constraints. The Sharp PC-4600 series from the late 1980s is a case in point: although it comes with standard serial and parallel ports, the only other external interface is a mysterious connector labelled EXPBUS on the back of the case. [Steven George] has been diving into the details of this port and managed to design a module to turn it into a pair of standard ISA ports.

Apparently, no peripherals were ever released for the EXPBUS port, so reverse-engineering an existing module was out of the question. [Steven] did stumble upon a service manual for the PC-4600 however, and as it turned out, the connector carried all the signals present in an 8-bit ISA bus. Turning it into something useful was simply a matter of designing an adapter board with the EXPBUS connector on one side and regular ISA slots on the other.

An expansion board plugged into a laptop, carrying two ISA cardsThe board also has an external power connector, to avoid overloading the laptop’s internal power supply, as well as a couple of buffer capacitors to smooth out the power rails. [Steven] tested the expansion board with a network adapter and a sound card, and it appears to be functioning well. It should be noted that only the +5 V power rail is available by default, so if any cards need +12 V or any negative rail, those should be provided externally.

Gerber files for this project are available on [Steven]’s website, so if you’ve got one of these machines lying around, now might be the time to upgrade it. This isn’t the first expansion for the PC-4600 series that [Steven] developed, either: he also designed an external floppy drive adapter that should ease data transfer with other PCs.

It’s great to see how the hacker community keeps classic portables like this one alive: one day it might also need a broken screen replaced or a dodgy power supply repaired.