Oscillator Needs Fine-Tuning

Since their invention more than a century ago, crystal oscillators have been foundational to electronic design. They allow for precise timekeeping for the clocks in computers as well as on our wrists, and can do it extremely accurately and inexpensively to boot. They aren’t without their downsides though; a quartz watch might lose or gain a few seconds a month due to variations in temperature and other non-ideal environmental situations, but for working in the world of high-frequency circuits this error is unacceptable. For that you might reach for something like an oven oscillator, a circuit with a temperature controlled chamber able to keep incredibly precise time.

[IMSAI Guy] found this 10 MHz oven oscillator on a site selling bulk electronics at bargain basement prices. But as is unsurprising for anyone who’s used a site like this to get cheap circuits, it didn’t quite hit its advertised frequency of 10.000000 MHz. The circuit design is capable of this amount of accuracy and precision, though, thanks to some cleverly-designed voltage dividers and filtering. One of those voltage dividers allows a potentiometer to control a very narrow range of output frequencies, and from the factory it was outputting between 9.999981 and 9.9999996 MHz. To get it to actually output a 10 MHz wave with eight significant digits of accuracy, a pull-up resistor on the voltage divider needed to be swapped out.

While this was a fairly simple fix, one might wonder how an off-the-shelf component like this would miss the mark in such an obvious way but still go into production. But that’s one of life’s great mysteries and also the fun of sourcing components like this. In this case, the oven oscillator was less than $10. But these circuits aren’t always as good of a deal as they seem.

Continue reading “Oscillator Needs Fine-Tuning”

M.2 Makes An Unusual Microcontroller Form Factor

When we think of an m.2 slot in our laptop or similar, it’s usually in the context of its PCI connectivity for high-speed applications such as solid state disks. It’s a connector that offers much more than that interface though, making it suitable for some unexpected add-ons. As an example [MagicWolfi] has produced an m.2 card which contains the equivalent of a Raspberry Pi Pico.

The board itself has the familiar m.2 edge connector at the bottom, and the RP2040 GPIO lines as postage-stamp indentations round the edges. On the m.2 front is uses the USB interface as well as a UART and the I2C lines, as well as some of the interfaces we’re less familiar with such as ALERT, WAKE, DISABLE1/2, LED 1/2, and VENDOR_DEFINED.

On one level this provides a handy internal microcontroller card with which you can do all the things you’d expect from a Pi Pico, but on another it provides the fascinating possibility of the Pico performing a watchdog or other function for the host device. We would be genuinely interested to hear more about the use of the m.2 slot in this way.

If you’d like to know more about m.2, we’ve taken a look at it in more depth.

A white handheld with a centered screen and Xbox-style controllers flanking an 8" screen. Speaker grilles are visible below the controllers in the face of the device.

Beth Deck Is A Framework-Powered Gaming Handheld

DIY gaming handhelds have long been the purview of the advanced hacker, with custom enclosures and fiddly soldering making it a project not for the faint of heart. [Beth Le] now brings us a custom handheld for the beginner that can be assembled in 15 minutes and doesn’t require any soldering.

These

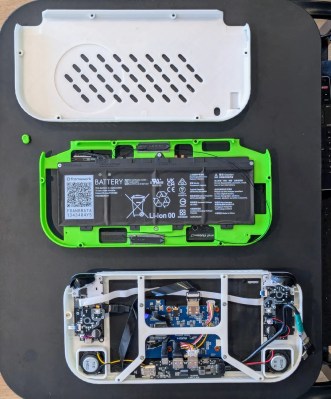
Three 3D printed panels sit on a black surface. The white back has cooling holes in it (top), a green center plate holds a Framework laptop battery (middle), and the front frame holds the speakers, controllers, and screen (bottom)

claims might seem suspicious at first, but the fact that the build is powered by a Framework mainboard makes the dream seem attainable. Using an 8″ touchscreen and a rehoused mobile device controller, the 3D printed enclosure turns the PCB and battery into an interesting alternative to a Steam Deck.

[Beth] recommends waiting for the forthcoming revision 2 to make your own as she is working on refining the model. She also suggests printing in PC or PETG since PLA is too brittle and ABS warping can be an issue for tolerances with the pogo pins. In any case, this is definitely a project to keep your eye on if you enjoy gaming on the go.

As you know, we love Framework around here and the Cambrian Explosion of high-powered custom builds it’s enabled. This isn’t the first time we’ve seen a Framework-Powered handheld either. If you’re looking for a different form factor, we’ve also seen portable all-in-ones, keyboard PCs, and slabtops too.

White pieces on a teal and white chess board. The line of pawns shows three segmented queens in the foreground, one piece being pressed by a man's hand from above in a state between queen and pawn, and the remainder of the pawns in the background in the pawn state.

Transforming Pawn Changes The Game

3D printing has allowed the hobbyist to turn out all sorts of interesting chess sets with either intricate details or things that are too specialized to warrant a full scale injection molded production run. Now, the magic of 3D printing has allowed [Works By Design] to change the game by making pawns that can automatically transform themselves into queens.

Inspired by a CGI transforming chess piece designed by [Polyfjord], [Works By Design] wanted to make a pawn that could transform itself exist in the real world. What started as a chonky setup with multiple springs and a manually-actuated mechanism eventually was whittled down to a single spring, some pins, and four magnets as vitamins for the 3D printed piece.

We always love getting a peek into the trial-and-error process of a project, especially for something with such a slick-looking final product. Paired with a special chess board with steel in the ends, the magnets in the base activate the transformation sequence when they reach the opposite end.

After you print your own, how about playing chess against the printer? We’d love to see a version machined from metal too.

Thanks to [DjBiohazard] on Discord for the tip!

Continue reading “Transforming Pawn Changes The Game”

Measuring Temperature Without A Thermometer

If you need to measure the temperature of something, chances are good that you could think up half a dozen ways to do it, pretty much all of which would involve some kind of thermometer, thermistor, thermocouple, or other thermo-adjacent device. But what if you need to measure something really hot, hot enough to destroy your instrument? How would you get the job done then?

Should you find yourself in this improbable situation, relax — [Anthony Francis-Jones] has you covered with this calorimetric method for measuring high temperatures. The principle is simple; rather than directly measuring the temperature of the flame, use it to heat up something of known mass and composition and then dunk that object in some water. If you know the amount of water and its temperature before and after, you can figure out how much energy was in the object. From that, you can work backward and calculate the temperature the object must have been at to have that amount of energy.

For the demonstration in the video below, [F-J] dangled a steel ball from a chain into a Bunsen burner flame and dunked it into 150 ml of room-temperature water. After a nice long toasting, the ball went into the drink, raising the temperature by 27 degrees. Knowing the specific heat capacity of water and steel and the mass of each, he worked the numbers and came up with an estimate of about 600°C for the flame. That’s off by a wide margin; typical estimates for a natural gas-powered burner are in the 1,500°C range.

We suspect the main source of error here is not letting the ball and flame come into equilibrium, but no matter — this is mainly intended as a demonstration of calorimetry. It might remind you of bomb calorimetry experiments in high school physics lab, which can also be used to explore human digestive efficiency, if you’re into that sort of thing.

Continue reading “Measuring Temperature Without A Thermometer”

Custom built Playstation handheld

The Phantom PSP: Crafting The Handheld Sony Never Sold

In the world of retro gaming, some legends never die – especially the ‘phantom’ PSP, Sony’s mythical handheld that never saw the light of day. While that elusive device remains a dream, hacker and gaming wizard [Kyle Brinkerhoff] built his own – and Macho Nacho made a video about it. His creation, which also goes by the name ‘Playstation Zero’, isn’t just another handheld emulator; it’s a powerful, custom-built system that revives the classics and plays them on a portable device that feels like the future.

Driven by a hunger for the ultimate gaming experience, [Kyle] set out to blend modern tech with retro gaming magic. He started with the Raspberry Pi, loading it up with emulation software for all the iconic systems—from NES and SNES to the Sega Genesis and Game Boy. But [Kyle] didn’t just slap on an off-the-shelf emulator; he dived into the code himself, optimizing and tweaking for lightning-fast responsiveness, so each game plays like it’s running on the original hardware. That’s hacking in true form: pushing the limits of software and hardware until they work exactly the way you want them to. Best of all: he published it all open source for others to use.

In the spirit of the Geneboy—a handheld Sega Genesis built by [Downing] and featured on Hackaday back in 2012—[Kyle]’s device pairs handheld emulation with the consoles all nineties kids wanted for Christmas. To capture the tactile thrill of vintage gaming, [Kyle] went a step further by designing and 3D-printing a custom controller layout that mimics the feel of the original systems. If watching someone neatly soldering a pcb sounds relaxing to you, don’t skip the middle part of his video. Although this little beast is packed with all bells and whistles you’d expect to see on a Raspberry Pi, it does lack one serious thing: battery life. But, [Kyle] is open about that, and hopes to improve on that in a future version.

If you want to see the full build, check out the video below. Or, immediately dive into [Kyle]’s Github, order the cute Takara shell, and get started!

Continue reading “The Phantom PSP: Crafting The Handheld Sony Never Sold”

3D Printed Hardware Sorter Keeps It Simple

If you’re like us, you’ve got at least one bin dedicated to keeping the random hardware you just can’t bear to part with. In our case it’s mostly populated with the nuts and bolts left over after finishing up a car repair, but however it gets filled, it’s a mess. The degree to which you can tolerate this mess will vary, but for [EmGi], even a moderately untidy pile of bolts was enough to spur this entirely 3D-printed mechanical bolt sorter.

The elements of this machine bear a strong resemblance to a lot of the sorting mechanisms we’ve seen used on automated manufacturing and assembly lines. The process starts with a hopper full of M3 cap head bolts of varying lengths, which are collated by a pair of elevating platforms. These line up the bolts and lift them onto a slotted feed ramp, which lets them dangle by their heads and pushes them into a fixture that moves them through a 90° arc and presents them to a long sorting ramp. The ramp has a series of increasingly longer slots; bolts roll right over the slots until they find the right slot, where they fall into a bin below. Nuts can also feed through the process and get sorted into their own bin.

What we like about [EmGi]’s design is its simplicity. There are no motors, bearings, springs, or other hardware — except for the hardware you’re sorting, of course. The entire machine is manually powered, so you can just grab a handful of hardware and start sorting. True, it can only sort M3 cap head bolts, but we suspect the design could be modified easily for other sizes and styles of fasteners. Check it out in action in the video below.

Just because it’s simple doesn’t mean we don’t like more complicated hardware sorters, like the ones [Christopher Helmke] builds.

Continue reading “3D Printed Hardware Sorter Keeps It Simple”