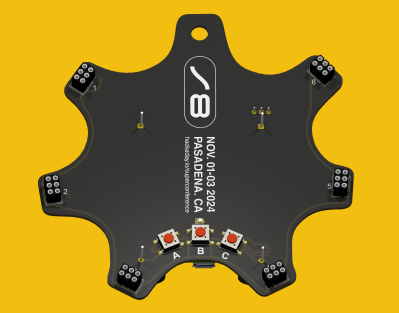
Supercon 2024 Flower SAO Badge Redrawing In KiCad

Out of curiosity, I redrew the Supercon Vectorscope badge schematics in KiCad last year. As you might suspect, going from PCB to schematic is opposite to the normal design flow of KiCad and most other PCB design tools. As a result, the schematics and PCB of the Vectorscope project were not really linked. I decided to try it again this year, but with the added goal of making a complete KiCad project. As usual, [Voja] provided a well drawn schematic diagram in PDF and CorelDRAW formats, and a PCB design using Altium’s Circuit Maker format (CSPcbDoc file). And for reference, this year I’m using KiCad v8 versus v7 last year.

Importing into KiCad

This went smoothly. KiCad imports Altium files, as I discovered last year. Converting the graphic lines to traces was easier than before, since the graphical lines are deleted in the conversion process. There was a file organizational quirk, however. I made a new, empty project and imported the Circuit Maker PCB file. It wasn’t obvious at first, but the importing action didn’t make use the new project I had just made. Instead, it created a completely new project in the directory holding the imported Circuit Maker file. This caused a lot of head scratching when I was editing the symbol and footprint library table files, and couldn’t figure out why my edits weren’t being seen by KiCad.  I’m not sure what the logic of this is, was an easy fix once you know what’s going on. I simply copied everything from the imported project and pasted it in my new, empty project.

While hardly necessary for this design, you can also import graphics into a KiCad schematic in a similar manner to the PCB editor. First, convert the CorelDRAW file into DXF or SVG — I used InkScape to make an SVG. Next do Import -> Graphics in the Kicad schematic editor. However, you immediately realize that, unlike the PCB editor, the schematic editor doesn’t have any concept of drawing layers. As a work around, you can instead import graphics into a new symbol, and place this symbol on a blank page. I’m not sure how helpful this would be in tracing out schematics in a real world scenario, since I just drew mine from scratch. But it’s worth trying if you have complex schematics.

Note: this didn’t work perfectly, however. For some reason, the text doesn’t survive being imported into KiCad. I attribute this to my poor InkScape skills rather than a shortcoming in KiCad or CorelDRAW. Despite having no text, I put this symbol on its own page in sheet two of the schematic, just for reference to see how it can be done.

Just like last year, the footprints in the Circuit Maker PCB file were imported into KiCad in a seemingly random manner. Some footprints import as expected. Others are imported such that each individual pad is a standalone footprint. This didn’t cause me any problems, since I made all new footprints by modifying standard KiCad ones. But if you wanted to save such a footprint-per-pad part into a single KiCad footprint, it would take a bit more effort to get right.

Recreating Schematics and Parts

After redrawing the schematics, I focused on getting the part footprints sorted out. I did them methodically one by one. The process went as follows for each part:

  • Start with the equivalent footprint from a KiCad library
  • Duplicate it into a local project library
  • Add the text SAO to the footprint name to avoid confusion.
  • Position and align the part on the PCB atop the imported footprint
  • Note and adjust for any differences — pad size and/or shape, etc.
  • Update the part in the project library
  • Attach it to the schematic symbols in the usual manner.
  • Delete the imported original footprint (can be  tricky to select)

Some parts were more interesting than others. For example, the six SAO connectors are placed at various non-obvious angles around the perimeter. I see that [Voja] slipped up once — the angle between connectors 4 and 5 is at a definitely non-oddball angle of 60 degrees.

SAO Angle Difference
#1   326  102  6->1
#2     8   42  1->2
#3    61   53  2->3
#4   118   57  3->4
#5   178   60  4->5
#6   224   46  5->6

With all this complete, the PCB artwork consists of all new footprints but uses the original traces. I needed to tweak a few traces here and there, but hopefully without detracting too much from [Voja]’s style. Speaking of style, for those interested in giving that free-hand look to hand-routed tracks in KiCad, check the options in the Interactive Router Settings menu. Choose the Highlight collisions / Free angle mode and set the PCB grid to a very small value. Free sketch away.

Glitches

I used two photos of the actual board to check when something wasn’t clear. One such puzzle was the 3-pad SMT solder ball jumper. This was shown on the schematic and on the fully assembled PCB, but it was not in the Circuit Maker design files. I assumed that the schematics and photos were the truth, and the PCB artwork was a previous revision. There is a chance that I got it backwards, but it’s an easy to fix if so. Adding the missing jumper took a bit of guesswork regarding the new and adjusted traces, because they were hard to see and/or underneath parts in the photo. This redrawn design may differ slightly in appearance but not in functionality.

DRC checks took a little more iterating than usual, and at one point I did something to break the edge cuts layer. The irregular features on this PCB didn’t help matters, but I eventually got everything cleaned up.

I had some trouble sometimes assigning nets to the traces. If I was lucky, putting the KiCad footprint on top of the traces assigned them their net names. Other times, I had traces which I had to manually assign to a net. This operation seemed to work sporatically, and I couldn’t figure out why. I was missing a mode that I remember from another decade in a PCB tool, maybe PCAD?, where you would first click on a net. Then you just clicked on any number of other items to stitch them into the net. In KiCad it is not that simple, but understandable given the less-frequent need for this functionality.

You may notice the thru hole leads on the 3D render are way too long. Manufacturers provide 3D files describing the part as they are shipped, which reasonably includes the long leads. They are only trimmed at installation. The virtual technician inside KiCad’s 3D viewer works at inhuman speeds, but has had limited training. She can install or remove all through hold or SMT parts on the board, in the blink of an eye. She can reposition eight lamps and change the background color in mere seconds. These are tasks that would occupy a human technician for hours. But she doesn’t know how to trim the leads off of thru hole parts. Maybe that will come in future versions.

Project Libraries

I like to extract all symbols, part footprints, and 3D files into separate project libraries when the design wraps up. KiCad experts will point out that for several versions now this is not necessary. All (or most) of this information is now stored in the design files, alghouth with one exception — the 3D files. Even so, I still feel safer making these project libraries, probably because I understand the process.

KiCad can now do this with a built-in function. See the Export -> Symbols to New Library and Export -> Footprints to New Library in the schematic and PCB editors, respectively. These actions give you the option to additionally change all references in the design to use this new library. This didn’t work completely for me, for reasons unclear. Eventually I just manually edited the sch and pcb file and fixed the library names with a search and replace operation.

Hint: When configuring project libraries in KiCad, I always give them a nickname that begins with a dot. For example, .badge24 or .stumbler. This always puts project libraries at the top of the long list of libraries, and it makes it easier to do manual search and replaces in the design files if needed.

What about 3D files, you say? That isn’t built into KiCad, but have no fear. [Mitja Nemec] has you covered with the Archive 3D Models KiCad plugin. It was trivial to activate and use in KiCad’s Plugin and Content Manager.

All Done

In the end, the design passed all DRCs, and I could run Update PCB from Schematic... without errors. I went out on a limb and immediately placed an order for five PCBs, hoping I hadn’t overlooked something. But it’s only US$9.00 risk. They are on the way from China as I type this.

All the files can be found in this GitHub repo. If you find any errors, raise an issue there. I have not done this procedure for any of the SAO petals, but when I do, I will place a link in the repository.
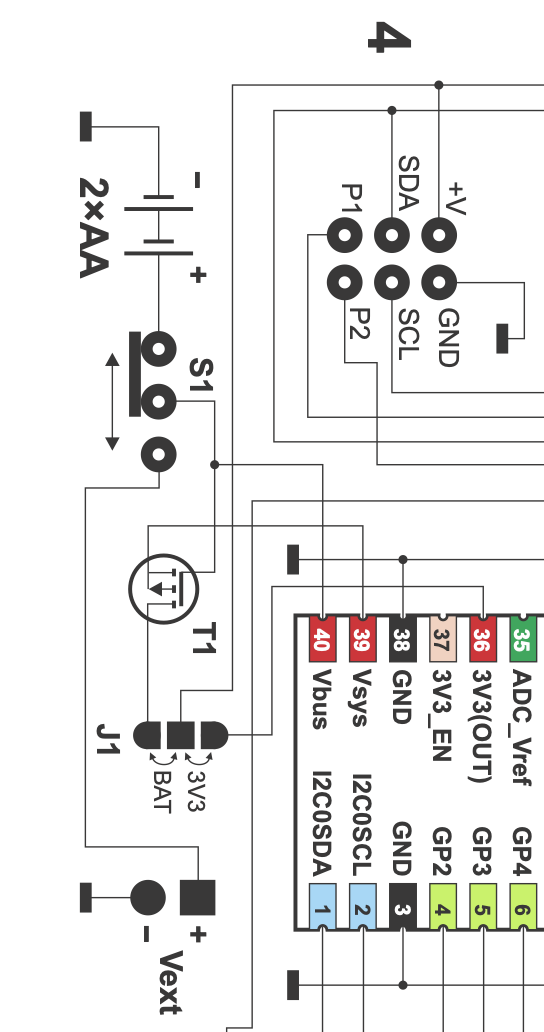
Schematics showing jumper

Zero To Custom MacroPad In 37 Easy Steps

[Jeremy Weatherford] clearly has a knack for explaining projects well enough for easy reproduction but goes way further than most and has created a four-part YouTube series detailing every step from project inception to the final assembly, covering all aspects of 3D modelling and PCB design for a custom MacroPad design. Many tools are introduced along the way, all of which help reduce complexity and, by extension, the scope for errors. As every beginner hacker knows, early successes breed confidence and make for better and more ambitious projects.

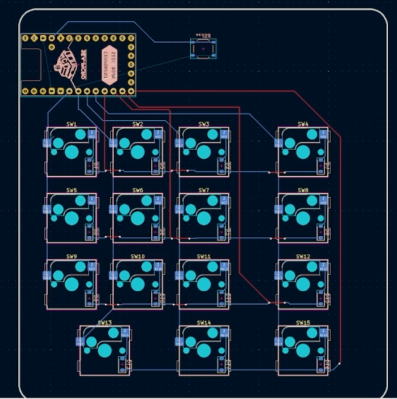
Part 1 covers the project motivation and scope and introduces a keyboard layout editor tool. This tool allows one to take a layout idea and generate a JSON file, which is then used to drive keyboard tools. XYZ to produce a usable KiCAD project. The tool only generates a PCB project and an associated netlist file. No schematic is created; you don’t need one for a simple layout.

A very basic keyboard layout

Part 2 is a walkthrough of the design process in KiCAD, culminating in ordering the PCB from JLCPCB and assembling the surface-mount parts. This particular design uses a controller based on the Sea-Picro RP2040 module, but there are many options if you have other preferences. [Jeremy] shows what’s possible with the selected suppliers, but you need not follow this step precisely if you have other ideas or want to use someone local.

Part 3 covers exporting the mechanical aspects of the PCB out of KiCAD and into a 3D CAD program, specifically OnShape. [Jeremy] covers some crucial details, such as how to read the mechanical drawing of the keys to work out where to place the top plate. It’s very easy to plough straight in at this stage and make a design which cannot be assembled! The plan is to use a simple laser-cut box with a bottom plate with mounting holes lining up with those on the PCB. A Top plate is created by taking the outline of the PCB and adding a little margin. An array of rectangular cutouts are designed for the keys to protrude, lining up perfectly with where the keys would be when mounted on the PCB below.  The sides of the case are formed from laser-cut sections that lock into each other and the laser-cut base—using the laser joint feature-script addon tool from the OnShape community channel. A second feature script addon is used to auto-layout the laser-cut components onto a single sheet. A CAM application called Kiri Moto is used to export for laser cutting and is available on the OnShape store.

Continue reading “Zero To Custom MacroPad In 37 Easy Steps”

Your Battery Holder Is Also Your Power Switch With ToggleSlot

We really like PCB-level hacks, especially ones that show ingenuity in solving a real problem while being super cheap to implement. Hackaday.IO user [Steph] wanted a cheap way to switch a wearable on and off without having to keep popping out the battery, so they came up with a tweaked battery footprint, which is also a simple slide switch.

Most people making badges and wearables will follow the same well-trodden path of just yanking out the cell or placing some cheap switch down and swallowing the additional cost. For [Steph], the solution was obvious. By taking a standard surface-mount CR2032 button cell holder footprint, extending its courtyard vertically, and moving the negative pad up a smidge, the battery can be simply slid up to engage the pad and slid down to disengage and shut off the juice. The spring section of the positive terminal keeps enough pressure on the battery to prevent it from sliding out, but if you are worried, you can always add a dummy pad at the bottom, as well as a little solder bump to add a bit more security.

Now, why didn’t we think of this before? The KiCad footprint file can be downloaded from the project GitHub page, imported into your project and used straight away.

Many of our gadgets are powered by CR2032 cells—so many so that eliminating the need for them leads to interesting projects, like this sweet USB-powered CR2032 eliminator. But how far can you push the humble cell? Well, we held a contest a few years ago to find out!

Illustrated Kristina with an IBM Model M keyboard floating between her hands.

Keebin’ With Kristina: The One With The KiCad Plugin

A low-profile split keyboard with a sliding, round track pad on each half.
Image by [fata1err0r81] via reddit
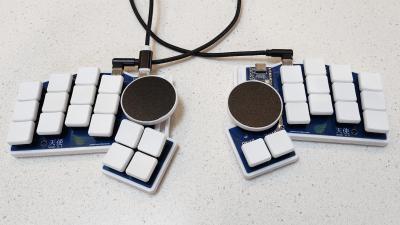
The most striking feature of the Tenshi keyboard has to be those dual track pads. But then you notice that [fata1err0r81] managed to sneak in two extra thumb keys on the left, and that those are tilted for comfort and ease of actuation.

The name Tenshi means ‘angel’ in Japanese, and creator [fata1err0r81] says that the track pads are the halos. Each one slides on a cool 3D-printed track that’s shaped like a half dovetail joint, which you can see it closer in this picture.

Tenshi uses a pair of RP2040 Zeros as controllers and runs QMK firmware. The track pads are 40 mm each and come from Cirque. While the Cirques have been integrated into QMK, the pull request for ZMK has yet to be merged in. And about those angled keys — [fata1err0r81] says they tried risers, but the tilting feels like less effort. Makes total sense to me, but then again I’m used to a whole keyboard full of tilted keys.

Continue reading “Keebin’ With Kristina: The One With The KiCad Plugin”

Hacker Tactic: Single-PCB Panels

Ordering a PCB? Two of them? Three? Five? For about eight years now, I’ve been regularly ordering large numbers of different PCBs, and, naturally, have developed a toolkit to make things smoother. One trick is PCB panelization, and you should really know about it.

You might’ve encountered PCB panels already. Perhaps, if you order PCBA at a fab, you will get your board returned in a whole new form-factor, with rails on the sides that you have to snap off before your PCB is usable. Those rails are used so that your PCBs are easier to handle during assembly, but that’s far from the only reason why you would make a panel.

If you need multiple pieces of a PCB, your fab may say that building 50 pcs is classified as “large batch” and that takes longer than 30 days, which delays your entire PCB order. I’ve been there, five years ago, running out of time right before Chinese New Year. The fix was simple – I made a 2×2 panel and ordered that in quantity of 10-15. Panelization might be a little more expensive, or maybe even cheaper, but, most importantly, it will be faster.

In a few hours’ time, I sat down, figured out that KiCad has built-in features for panelization, and ordered panels instead of separate PCBs. Thanks to that, I made the Chinese New Year deadline that year and could successfully restock my store, letting me earn a fair bit of money instead of keeping a popular product out-of-stock – ultimately, helping my family stay up on rent that month.

Panelization lets you hack around many PCB ordering and assembly limitations, and I’ve only gotten started – there’s way way more! For now, let’s sort out panelizing multiples of the same PCB. As long as your boards are using KiCad (or KiCad-converted from Eagle/EasyEDA/Altium/gerbers), there’s no better software than KiKit.

Continue reading “Hacker Tactic: Single-PCB Panels”

An example of the case generated for a simple PCB, being shown in the OpenSCAD viewer

Turbocase Generates A PCB Shell For You

Our PCBs greatly benefit from cases – what’s with all the pins that can be accidentally shorted, connectors that stick out of the outline, and cables pulling the board into different directions. Designing a case for your PCB might feel like a fair bit of effort – but it likely isn’t, thanks to projects like turbocase from [Martijn Braam].

This script generates simple and elegant OpenSCAD cases for your KiCad PCBs – you only need to draw a few extra lines in the PCB Editor, that’s it. It makes connector openings, too – add a “Height” property to your connector footprints to have them be handled automatically. Oh, and there’s a few quality-of-life features – if your project has mounting holes, the script will add threaded-insert-friendly standoffs to the case; yet another argument for adding mounting holes to your boards, in case you needed more.

Installing the script is a single line, running it is merely another, and that will cover an overwhelming majority of boards out there; the code is all open too, of course. Want some more customization? Here’s some general project enclosure tutorials for OpenSCAD, and a KiCad-friendly StepUp tutorial. Oh, and of course, there’s many more ways to enclose PCBs – our own [Bob Baddeley] has written a guide to project enclosures that you are bound to learn new things from.

We thank [adistuder] for sharing this with us!

Screenshot of the GitHub Marketplace action listing, describing the extension

Giving Your KiCad PCB Repository Pretty Pictures

Publishing your boards on GitHub or GitLab is a must, and leads to wonderful outcomes in the hacker world. On their own, however, your board files might have the repo look a bit barren; having a picture or two in the README is the best. Making them yourself takes time – what if you could have it happen automatically? Enter kicad-render, a GitHub and GitLab integration for rendering your KiCad projects by [linalinn].

This integration makes your board pictures, top and bottom view, generated on every push into the repo – just embed two image links into your README.md. This integration is made possible thanks to the new option in KiCad 8’s kicad-cli – board image generation, and [linalinn]’s code makes KiCad run on GitHub/GitLab servers.

For even more bling, you can enable an option to generate a GIF that rotates your board, in the style of that one [arturo182] demo – in fact, this integration’s GIF code was borrowed from that script! Got a repository with many boards in one? There’s an option you could make work for yourself, too.

All you need to do is to follow a couple of simple steps; [linalinn] has documented both the GitHub and GitLab integration. We’ve recently talked about KiCad integrations in more detail, if you’re wondering what else your repository could be doing!