Behold A First-Person 3D Maze, Vintage Atari Style

[Joe Musashi] was inspired by discussions about 3D engines and decided to create a first-person 3D maze of his own. The really neat part? It could have been done on vintage Atari hardware. Well, mostly.

He does admit he had to do a little cheating to make this work; he relies on code for the ARM processor in the modern Atari VCS do the ray casting work, and the 6507 chip just handles the display kernel. Still, running his demo on a vintage Atari 2600 console could be possible, but would definitely require a Melody or Harmony cartridge, which are special reprogrammable cartridges popular for development and homebrew.

Ray casting is a conceptually simple method of generating a 3D view from given perspective, and here’s a tutorial that will tell you all you need to know about how it works, and how to implement your own.

[Joe]’s demo is just a navigable 3D maze rather than a game, but it’s pretty wild to see what could in theory have run on such an old platform, even if a few modern cheats are needed to pull it off. And if you agree that it’s neat, then hold onto your hats because a full 3D ray casting game — complete with a micro physics engine — was perfectly doable on the Commodore PET, which even had the additional limitation of a monochrome character-based display.

Clockwork Derby gameboard

Clockwork Derby: Digital Robo Rally, Steampunk Style

Inspired by the classic game Robo Rally, [Ytec3D]’s Clockwork Derby takes tabletop gaming to the next level by combining steampunk aesthetics with automation. We recently had the chance to see it live at Hackfest, together with [Ytec3D]’s animatronic tentacle, and we can say that his new take on playful robotics offers a unique experience for game enthusiasts. The 300×420 mm board uses magnets, motors, and card readers to handle up to eight players, creating a smooth, automated version of Robo Rally where players can focus on strategy while the board handles movement.

In Clockwork Derby, game pieces are moved by a magnetic system controlled by the board, which rotates and shifts pieces in real-time. Each player uses a card reader to program moves, with up to five cards per round. The board scans these cards via barcode scanners, so you don’t have to worry about tracking your moves or adjusting game pieces manually. [Ytec3D]’s game rules have been optimized for the automated setup, allowing for smoother gameplay and an emphasis on strategic choices.

The project is a standout for hackers and tinkerers who appreciate blending physical mechanics with digital precision. It’s a great example of how classic games can be modernized with a bit of ingenuity and tech. For those interested in DIY gaming projects or automation, Clockwork Derby is definitely worth exploring. To dive deeper into the build details and see more of the project, visit [Ytec3D]’s project page for an in-person look at this inventive tabletop game!

Continue reading Clockwork Derby: Digital Robo Rally, Steampunk Style”

Arduboy Cassette Award Explores New Features

When [Press Play on Tape] entered their game Prince of Arabia into the Arduboy FX Game Jam, we bet they had no idea that they’d be taking home a prize quite like this — designed by Arduboy creator [Kevin Bates], this gorgeous new variant of the handheld system brings some exciting new capabilities to the platform. Plus, it looks awesome.

The system, which is made up of a stacked pair of PCBs, has been designed to resemble an audio cassette. Thanks to the full-color silkscreen service offered by PCBway, it certainly looks the part. But it’s also a fully functional Arduboy, which means it has access to all the games already written for the 8-bit system.

Continue reading “Arduboy Cassette Award Explores New Features”

Are CRT TVs Important For Retro Gaming?

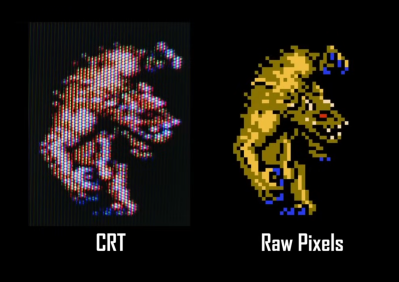
We always thought the older console games looked way better back in the day on old CRTs than now on a modern digital display. [Stephen Walters] thinks so too, and goes into extensive detail in a lengthy YouTube video about the pros and cons of CRT vs digital, which was totally worth an hour of our time. But are CRTs necessary for retro gaming?

The story starts with [Stephen] trying to score a decent CRT from the usual avenue and failing to find anything worth looking at. The first taste of a CRT display came for free. Left looking lonely at the roadside, [Stephen] spotted it whilst driving home. This was a tiny 13″ Sanyo DS13320, which, when tested, looked disappointing, with a blurry image and missing edges. Later, they acquired a few more displays: a Pansonic PV-C2060, an Emerson EWF2004A and a splendid-looking Sony KV24FS120. Some were inadequate in various ways, lacking stereo sound and component input options.

A poor analog cable coupled with rendering inaccuracy gives a nice filtering effect

A large video section discusses the reasons for the early TV standards. US displays (and many others using NTSC) were designed for 525 scan lines, of which 480 were generally visible. These displays were interlaced, drawing alternating fields of odd and even line numbers, and early TV programs and NTSC DVDs were formatted in this fashion. Early gaming consoles such as the NES and SNES, however, were intended for 240p (‘p’ for progressive) content, which means they do not interlace and send out a blank line every other scan line.  [Stephen] goes into extensive detail about how 240p content was never intended to be viewed on a modern, sharp display but was intended to be filtered by the analogue nature of the CRT, or at least its less-than-ideal connectivity. Specific titles even used dithering to create the illusion of smooth gradients, which honestly look terrible on a pixel-sharp digital display. We know the differences in signal bandwidth and distortion of the various analog connection standards affect the visuals. Though RGB and component video may be the top two standards for quality, games were likely intended to be viewed via the cheaper and more common composite cable route.

Continue reading “Are CRT TVs Important For Retro Gaming?”

Running Game Boy Games On STM32 MCUs Is Peanuts

Using a STM32F429 Discovery board [Jan Zwiener] put together a Game Boy-compatible system called STM32Boy. It is based around the Peanut-GB Game Boy emulator core, which is a pretty nifty and fast single-header GB emulator library in C99. Considering that the average 32-bit MCU these days is significantly faster than the ~4 MHz  8-bit Sharp SM83 (Intel 8080/Zilog Z80 hybrid) in the original Game Boy it’s probably no surprise that the STM32F429 (up to 180 MHz) can emulate this 8-bit SoC just fine.

Since Peanut-GB is a library, the developer using it is expected to provide their own routines to read and write RAM and ROM and to handle errors. Optional are the line drawing, audio read/write and serial Tx/Rx functions, with the library providing reset and a host of other utility functions. Audio functionality is provided externally, such as using the provided MiniGB APU. Although fast, it comes with a range of caveats that limit compatibility and accuracy.

For STM32Boy, [Jan] uses the LCD screen that’s on the STM32 development board to render the screen on, along with a Game Boy skin. The LCD’s touch feature is then used for the controls, as can be elucidated from the main source file. Of note is that the target GB ROM is directly compiled into the firmware image rather than provided via an external SD card. This involves using the xxd tool to create a hex version of the ROM image that can be included. Not a bad way to get a PoC up and running, but we imagine that if you want to create a more usable GB-like system it should at least be able to play more than one game without having to reflash the MCU.

Quake In 276 KB Of RAM

Porting the original DOOM to various pieces of esoteric hardware is a rite of passage in some software circles. But in the modern world, we can get better performance than the 386 processor required to run the 1993 shooter for the cost of a dinner at a nice restaurant — with plenty of other embedded systems blowing these original minimum system requirements out of the water.

For a much tougher challenge, a group from Silicon Labs decided to port DOOM‘s successor, Quake, to the Arduino Nano Matter Board platform instead even though this platform has some pretty significant limitations for a game as advanced as Quake.

To begin work on the memory problem, the group began with a port of Quake originally designed for Windows, allowing them to use a modern Windows machine to whittle down the memory usage before moving over to hardware. They do have a flash memory module available as well, but there’s a speed penalty with this type of memory. To improve speed they did what any true gamer would do with their system: overclock the processor. This got them to around 10 frames per second, which is playable, but not particularly enjoyable. The further optimizations to improve the FPS required a much deeper dive which included generating lookup tables instead of relying on computation, optimizing some of the original C programming, coding some functions in assembly, and only refreshing certain sections of the screen when needed.

On a technical level, Quake was a dramatic improvement over DOOM, allowing for things like real-time 3D rendering, polygonal models instead of sprites, and much more intricate level design. As a result, ports of this game tend to rely on much more powerful processors than DOOM ports and this team shows real mastery of their hardware to pull off a build with a system with these limitations. Other Quake ports we’ve seen like this one running on an iPod Classic require a similar level of knowledge of the code and the ability to use assembly language to make optimizations.

Thanks to [Nicola] for the tip!

Creating Video Games With AI: A Mario Example

Artificial intelligence (AI) seems to be doing everything these days. Making images, making videos, and replacing most of us real human writers if you believe the hype. Maybe it’s all over! And yet, we persist, to write about yet another job taken over by AI: creating video games.

The research paper is entitled “Video Game Generation: A Practical Study using Mario.” The basic idea is whether a generative AI model can create an interactive video game by first training it on an existing game.

MarioVGG, as it is called, is a “text-to-video model.” It hasn’t built the Mario game that you’re familiar with, though. It takes player commands as text inputs—such as “run, or “jump”—and then outputs video frames showing the result in the ‘game.’ The model was trained on a dataset of frame-by-frame Super Mario Brothers game play, combined with data on user inputs at the time. The model shows an ability to generate believable video output for given player inputs, including basic game physics, item interactions, and collisions. It’s able to do this in a chained way, so that it can reasonably simulate a player making multiple actions and moving through a level of the game.

It’s not like playing a real Mario game yet, by any means. Regardless, the AI model has shown an ability to replicate the world of the game in a way that behaves relatively consistently with its established rules. If you’re in the field of video game development, though, you probably don’t have a lot to worry about just yet—you probably moved past making basic Mario clones years ago, so you’ve got quite an edge for now!